Create your own voter contact app using Glide
by Caitlin Huxley
Voter Contact is important!
The goal of your voter outreach effort is to build relationships with the voters themselves, and create a connection. You want them to remember your name on elections day, and studies tell us that you'll need 7 or more connections with them before that happens. Too many small campaigns end up walking with paper walkbooks. If your campaign is too small for a traditional walk app, you certainly don't have the time or volunteer power to add every voter back in to your spreadsheets after your walks.
You need an app. If you can't buy one, now you can make one!

|
 |
 |
|
Map View Filter results by precinct to decide on your own walkbook, or use the search bar to find a specific street name, address, or voter. |
Voter Details Completely customizable list of voter records, with functionality for 1-button contacts (phone, text, and email), and a list of other voters in the Household. |
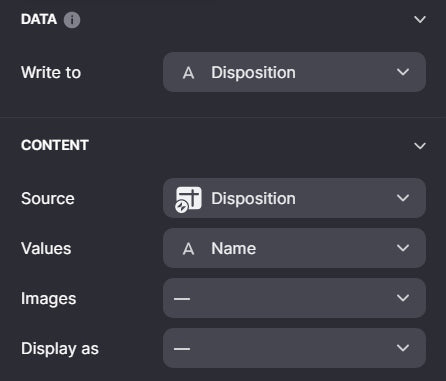
Survey A Voter Add Drop-down menus, sliders, or text entry fields to capture support, yard sign locations, emails, and a custom notes field. |
Requirements to get started:
- Access to your Voter Data (this tutorial uses GOP DataCenter)
- Excel Skills enough to manipulate that data
- A Glide account (can be made for free)
- A little bit of tech savviness us use their system.
Limitations:
-
Glide: Glide is free to use for up to 3 copies of an app, with about 450 voters each. If you don't mind changing out your data each time you finish a walkbook, then there should be no issue. But, if you want a little more flexibility, you can go up to the $25/month paid version, and that number jumps up to 5 copies of the app, with almost 5,000 voters each.
- Mapbox: The map viewer tool inside the app itself is limited to 10,000 sets of lat/long coordinates. It will not work with addresses alone, and therefore the data you use MUST have latitude and longitude coordinates. There are plenty of resources online for finding the geo coordinates, but lat-long coordinates are available in GOP Datacenter, and for those without access, a service like GeoCod.io will give you 2500 free lookups per day.
Step 1: Gather & Format Your Voter Data
As mentioned above, this tutorial uses GOP datacenter. If you do not have access to GOP DataCenter, because you are running in a non-partisan race or for some other reason, you can usually get your voter data from the state or county board of elections in your area. This is usually free, but sometimes incurs a small cost.
For ease of use, your data should have the following headers, named exactly like this:
- StateVoterId
- Name
- Address
- Phone
- CalculatedParty
- PrecinctName
- LatLong
Chances are that your data will not be in this format when you receive it from the Board of Elections, or download it from GOP DataCenter. If you import data that has extra columns into Glide, or if your columns are named incorrectly, you will have to remap parts of the app, and that is quite a pain before you've become familiar with how Glide works.

Step 2: Signing up for Glide
Head over to go.glideapps.com and create yourself an account.
Enter your email address, or select 'Sign in with Google'. If this is your first time here, you'll see a message saying you don't have an account yet. Just click "Create Account" and on the next few screens, enter data about yourself.
When you get to the "What are you looking to build?" screen, just click Skip in the bottom right. On "Connect your data" hit skip again. It will automatically open a sample project for you to play around with, and I recommend messing around with it a bit, just to get a hang of their system.
Step 3: Creating the App
Full disclosure. This app took me about 20 hours over 4 days to make, and tweak until I got exactly to the state that I felt it was completed. Following this tutorial, you can probably cut that time down to a few hours, and reproduce its' bare bones functionality. If you're tech savvy, and are already familiar with Glide you might be able to do it in an afternoon.
If you want to skip this step, and go directly to uploading your data, I've created a template you can use for free here: https://votercontact-template-2fq.glideapp.io/dl/d8fc49
Part 1: Create a new project
When you're ready to get started, click the 3x3 square of white dots in the top left to go to the home screen, and click on New Project.

Name your project and be sure to select Glide App as your project type. The Pages have a few features not available to Apps, but is missing on crucial one: the ability to view the map full screen. For me, that's a deal breaker - but if you want to just make a phone call or group texting app, then a Page would probably work better because of it's web capabilities.

One of the great things about Glide is it can work directly from a Google Sheet, or an Airtable. For our purposes though, a Glide Table is going to work fine. Select it, and click "Create Project".
Part 2: Upload your data
A fake project will be created for you. At the top of the screen, you'll see three icons:


Part 3: Add a map component


Part 4: Edit the voter details screen


Part 5: Add a survey
Part 6: Remove surveyed voters

Part 7: Extra Features
In this section we'll run through a number of small features that I highly recommend adding.
If you don't want to go through the trouble of configuring them yourself, all the features here, and some more, including a video tutorial and some in-app training are also bundled in to the template I have made available for use here: https://votercontact-template-2fq.glideapp.io/dl/d8fc49
Phones Calls & Texts:
If you want volunteers to be able to make calls or texts, head back to the Voter Details screen delete the default phone, click the white + button to add a new component, and add a new Phone Button. Make sure the column is set to "Phone" on the right hand side, and keep the check marks "Allow phone calls" and "Allow text messages" checked.


Step 4: Publish and share the link
Give your volunteers the link to your app, to have them make calls and knock on doors. But before they can use it, you'll have to add their names and email addresses to the Users Table. If you hit the gear icon at the top middle of the screen, and navigate to the "Users and authentication" right hand option, you can also toggle the options for Allowing users to sign in with Google or Allow Visitors to Request Access. Then volunteers can enter their own email, and click the Request Access button in the app, and their names will automatically appear under the "Access Requests" tab in the Users Table:

Once all the voters are gone from the list, or when you're ready, you can navigate to the Data Editor menu on the top of the screen, right click the VoterList, and click export. Select the columns you want, and click Export. You'll get a download notification automatically.
Congrats! You are now the master of your own data, all for less than $25/month.